Exertion and joint-capacity indicators
This panel is part of the Exertion window. For each joint and movement, it shows the required moment as a percentage of the capacity or limit used as its reference.
The percentage name depends on Biomechanical analysis settings:
- By default, it shows Percentage of Maximum Recommended Exertion (%MRE), which supports preventive prioritization among body regions.
- If Calculate max. recommended exertion (%) is disabled for a single posture, it shows % recommended joint capacity.
- In Multiple Postures mode, with Include cumulative exertion load in recommended exertion (%) enabled, it also shows % recommended joint capacity, but capacity may decrease during exertion and recover during rest.
- If that option is disabled, it shows Percentage of Maximum Isometric Capacity Used, comparing exertion with estimated maximum isometric capacity without previous activity.
The panel title changes automatically to identify the percentage. The bars quickly identify joints or movements near or above the active reference.
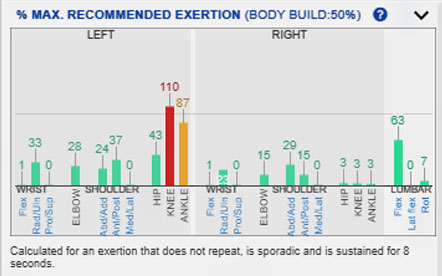
The figure shows the default behavior, with epidemiological priority adjustment enabled and %MRE displayed.
| Element | Function |
|---|---|
| Vertical bars | Show %MRE, % recommended joint capacity, or Percentage of Maximum Isometric Capacity Used for each joint and movement, as identified by the panel title. |
| Left and right areas | Separate results for the left and right sides of the body. |
| Joint labels | Identify the body segment or joint and its degree of freedom. |
| Number above each bar | Shows the exact value of the active indicator. |
| Text below the panel | Summarizes the temporal context used for the calculation. |
What this panel shows
The panel represents the percentage reached relative to the active capacity or limit. By default it shows Percentage of Maximum Recommended Exertion (%MRE). Depending on the operating mode and settings, it can instead show % recommended joint capacity or Percentage of Maximum Isometric Capacity Used. The title always identifies the result.
Each bar represents a movement of a joint or body segment. Results are shown for the:
- wrist;
- elbow;
- shoulder;
- hip;
- knee;
- ankle;
- lumbar region.
Degrees of freedom include:
- flexion/extension;
- abduction/adduction or lateral flexion;
- rotation.
Labels are concise operational terms, so some movement names should be understood generally rather than as exact anatomical terminology.
The number above each bar is the percentage for that movement. Always read the title to identify the active capacity or limit; results with different indicator names should not be compared directly.
Displayed indicator
The panel title identifies the percentage and its reference.
Percentage of Maximum Recommended Exertion (%MRE) is the default. It helps establish preventive priorities by accounting for differences in the prevalence of musculoskeletal disorders among body regions.
If Calculate max. recommended exertion (%) is disabled:
- in Single Posture mode, the panel shows % recommended joint capacity, adjusted for model characteristics and the action’s duration and repetition;
- in Multiple Postures mode, with previous exertion and recovery included, it shows % recommended joint capacity, updated from the sequence history;
- if previous exertion is not included, it shows Percentage of Maximum Isometric Capacity Used.
Select this behavior under Biomechanical analysis settings. %MRE is a comparative preventive-priority indicator, not an individual injury probability.
General interpretation
The panel compares:
- the moment required by the posture and applied loads;
- the capacity or reference limit identified by the panel title.
A low percentage is clearly below the reference. A value near 100% approaches it, and a value above 100% exceeds it.
The exact meaning depends on the indicator:
- %MRE uses a limit intended for preventive prioritization;
- % recommended joint capacity uses the recommended capacity for the analyzed conditions;
- Percentage of Maximum Isometric Capacity Used uses estimated maximum isometric capacity.
Do not directly compare percentages obtained with different indicators or settings. Keep the same configuration when comparing postures or design alternatives.
The panel identifies movements requiring attention, but interpret it together with posture, loads, activity duration, and the other Exertion panels.
Color coding
Vertical bars use color coding. Thresholds are configured under Visualization settings; initial values are 85% for Warning and 100% for Risk.
Changing thresholds changes only visual classification, not the calculated percentage, regardless of the displayed indicator.
Green bars
Green indicates a value below the configured Warning threshold, initially below 85%.
Orange bars
Orange indicates a value at or above Warning but below Risk, initially from 85% to less than 100%. Review the posture, applied load, and task conditions.
Red bars
Red indicates a value at or above the configured Risk threshold, initially 100%. With the default threshold, it means that the active reference has been reached or exceeded for that movement and side.
Review red results carefully, especially when the posture is held for a long time or repeated frequently.
How the indicators are calculated
Every indicator starts with two estimates:
- the moment required by the posture and applied loads;
- the estimated maximum isometric capacity for the person, joint, and movement.
The remaining procedure depends on the operating mode.
For a single posture, Ergoniza Intelligent:
- considers the configured action duration and repetition;
- determines the proportion of maximum capacity recommended for those conditions;
- compares the required moment with that capacity to obtain % recommended joint capacity;
- when Calculate max. recommended exertion (%) is enabled, also applies preventive weighting for the body region and displays %MRE.
In Multiple Postures mode, it:
- calculates the required moment at each instant;
- when Include cumulative exertion load in recommended exertion (%) is enabled, updates recommended capacity from previous exertion and rest;
- otherwise retains estimated maximum isometric capacity as the reference;
- when Calculate max. recommended exertion (%) is enabled, applies preventive-priority weighting.
The numeric value shown under Cumulative exertion load is calculated separately and is not directly used to reduce recommended capacity.
See 3CC-r model and Recommended Moment in multiple-posture analysis for the equations.
Factors that affect the calculation
The displayed percentage can be affected by:
- model anthropometry;
- height;
- body mass;
- body build;
- sex;
- age range;
- dominant side;
- adopted posture;
- applied load or force;
- support condition and stability;
- seated posture, when applicable;
- temporal configuration;
- in Multiple Postures mode, posture order and duration and recovery periods;
- whether previous exertion is included in recommended capacity;
- whether epidemiological priority adjustment is enabled;
- for %MRE, the Influence value and prevalence assigned to the body region.
Changes to the model configuration can therefore change this panel.
Review:
- Model settings
- Load or force on the hands
- Loads on body segments
- Seated posture
- Stabilogram
- Biomechanical analysis settings
Relationship to body build
The panel title may include:
BODY BUILD:50%
This identifies the body build used in the analysis.
Body build affects estimated maximum isometric capacity and can therefore change any percentage shown in the panel. Before comparing results, verify that it represents the assessed person. Change it under Model settings.
Relationship to applied loads
Applied loads strongly affect the results. Increasing a load or force on the hands or other body segments normally increases the required moment and may increase any displayed percentage.
Always verify that entered loads match the actual situation. See:
Relationship to duration and repetitiveness
Duration and repetition can affect results but are used differently in each mode.
For a single posture, the values in Action duration and repetitiveness determine the proportion of maximum capacity recommended during that action.
In Multiple Postures mode, order, duration, repetitions, and rest are configured under Activity repetitions. When previous exertion is included, this information estimates how recommended capacity decreases during exertion and recovers during rest.
This capacity update differs from Cumulative exertion load, which summarizes cumulative demand. Both use the same time sequence but are calculated separately.
If Consider repetitions and rest periods is disabled, both temporal results cease to be calculated and only instantaneous posture results remain.
Relationship to other Exertion panels
For a complete interpretation, use this panel with:
- Unprotected population
- Biomechanical exertions
- Cumulative exertion load
- Joint loads
- Support reaction loads
Each provides a complementary biomechanical perspective.
Practical interpretation procedure
- Read the panel title to identify the displayed percentage.
- Verify the intended options under Biomechanical analysis settings.
- In Multiple Postures mode, check whether previous exertion and rest are included in recommended capacity.
- Review the Warning and Risk thresholds used for colors.
- Locate red bars, then orange bars.
- Identify the joint, side, and movement with the highest values.
- Verify that posture, loads, and model characteristics represent the actual situation.
- Review stability and supports when weight distribution may affect the result.
- In Multiple Postures mode, also review cumulative load and repetition/rest settings.
Recommendations for use
- Review capture quality before interpreting a high value.
- Verify the applied load.
- Account for the configured anthropometric and biomechanical model.
- Compare left and right sides for asymmetry.
- For a time-based activity, review this panel with cumulative load and repetition/rest settings.
- When comparing designs, keep model parameters, load conditions, selected indicator, Influence value, and visual thresholds constant.
- To view results without preventive-priority weighting, disable Calculate max. recommended exertion (%) and read the panel title. In Multiple Postures mode, the reference also depends on whether previous exertion is included.
- Do not interpret %MRE as individual injury probability.
- Remember that changing color thresholds does not change the calculated indicator.
Relationship to the Technical foundations
For further methodological detail, see:
- Overexertion risk analysis
- Maximum joint capacities
- Exertion assessment
- Percentage of Maximum Recommended Exertion
- Interface representation
- Recommended maximum voluntary contraction percentage in single-posture analysis
- Instantaneous relative exertion
- 3CC-r model and Recommended Moment in multiple-posture analysis
- Cumulative exertion load in multiple-posture analysis
- Cumulative exertion-load concept
- Temporal integration of dose and cumulative-load update
- Conceptual differences between single- and multiple-posture analysis
These sections explain the indicators, preventive-priority weighting, joint-capacity estimation, recommended-capacity updates during a sequence, and the difference between instantaneous exertion and cumulative activity load.