Visualization settings
The Visualization panel changes how the biomechanical model and work scene are displayed. These settings do not change the posture or the biomechanical assessment data, but they make it easier to visually review the model, interpret the scene, and prepare screenshots or presentations of the results.
Some visualization parameters, such as shadows or resolution, can affect graphics performance. If the scene does not play smoothly, reduce the graphics workload by disabling shadows or lowering the resolution.
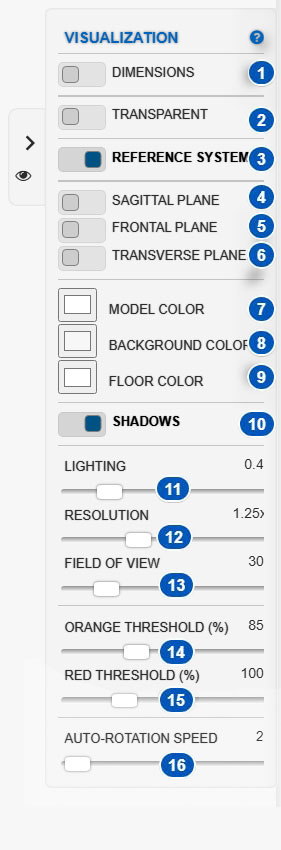
| No. | Parameter | Function |
|---|---|---|
| 1 | Dimensions | Displays information about the length and mass of each body segment on the model. |
| 2 | Transparent | Displays the human model with a transparent appearance. |
| 3 | Reference system | Displays the reference system on the floor plane. |
| 4 | Sagittal plane | Displays the sagittal reference plane. |
| 5 | Frontal plane | Displays the frontal reference plane. |
| 6 | Transverse plane | Displays the transverse reference plane. |
| 7 | Model color | Changes the color of the human model. |
| 8 | Background color | Changes the scene background color. |
| 9 | Floor color | Changes the color of the floor surface. |
| 10 | Shadows | Enables or disables shadows in the scene. |
| 11 | Lighting | Increases or decreases the overall lighting of the scene. |
| 12 | Resolution | Increases or decreases the display resolution. |
| 13 | Field of view | Changes the field of view of the scene camera. |
| 14 | Orange threshold | Defines the percentage at which some results begin to be visually highlighted as requiring attention. |
| 15 | Red threshold | Defines the percentage at which some results are visually represented as critical. |
| 16 | Auto-rotation speed | Adjusts how quickly the model rotates when auto-rotation is enabled. |
Visual model information
The Dimensions control, numbered 1, displays information about the length and mass of each body segment on the model. This option can be useful for reviewing the model’s anthropometric settings or checking how its body segments are distributed.
The Transparent control, numbered 2, displays the human model transparently. This option makes it easier to inspect certain positions when the model’s own volume obscures joints, axes, or elements behind a body segment.
Reference system and anatomical planes
The Reference system control, numbered 3, displays the reference system on the floor plane. This view helps you interpret the model’s orientation and the direction of movements or applied forces.
Controls 4, 5, and 6 display the main anatomical planes:
- control 4 displays the sagittal plane;
- control 5 displays the frontal plane;
- control 6 displays the transverse plane.
These planes can help you review body orientation and visually interpret flexion, extension, lateral flexion, abduction, adduction, or rotation. They can also help confirm that you are viewing the model’s posture from an appropriate perspective.
Scene colors
Controls 7, 8, and 9 change the main colors of the visualization.
The Model color control, numbered 7, changes the color of the human model. This option can improve contrast between the model and the background or help you prepare clearer screenshots.
The Background color control, numbered 8, changes the scene background color. A suitable background can make the model easier to read, especially when analysis colors or overlaid graphics are displayed.
The Floor color control, numbered 9, changes the color of the floor surface. This setting can make supports, shadows, axes, or references on the lower plane of the scene easier to see.
Shadows and graphics performance
The Shadows control, numbered 10, enables or disables shadows in the visualization.
Shadows provide visual information about the model’s position relative to the floor and can improve the spatial perception of the scene. However, rendering them may require additional graphics processing.
If the model does not move smoothly enough or playback of a time-based activity lags, disable this control to reduce the graphics workload.
Lighting
The Lighting control, numbered 11, increases or decreases the overall lighting of the scene.
Suitable lighting makes it easier to visually review the model, body segments, and overlaid graphics. If the scene appears too dark or too bright, adjust this parameter until the display is comfortable to view.
This setting affects only the visual appearance of the scene. It does not change the posture, loads, or biomechanical results.
Resolution
The Resolution control, numbered 12, increases or decreases the display resolution.
A high resolution can improve scene sharpness, but it can also slow playback, especially on computers with limited graphics performance or when working with animations and time-based analyses.
If playback lags, loses smoothness, or responds slowly when you manipulate the model, reduce the resolution. If the system responds smoothly and you need greater sharpness, increase it.
Field of view
The Field of view control, numbered 13, changes the viewing angle of the scene camera.
This setting changes how much of the scene the camera displays and how perspective is perceived. It can help you frame the model or a particular area of the scene and improve the presentation of screenshots or results.
For a neutral, direct view when assessing a posture, use a value that does not distort or hinder inspection of the body segments.
Color thresholds for percentage results
The Orange threshold and Red threshold controls, numbered 14 and 15, adjust the visual criteria Ergoniza Intelligent uses to classify some results expressed as percentages.
These thresholds do not change ergonomic calculations or the values produced by the assessment methods. They change only how certain values are represented by colors in the interface.
They may affect displays such as:
- biomechanical exertion bars;
- cumulative exertion load values;
- postural discomfort percentages;
- colored areas of the human model;
- tables or charts that use color codes to represent percentages.
Do not confuse them with scores, action levels, or limits defined by specific methods such as REBA, LUBA, or other assessment procedures. The numerical results of those methods remain unchanged.
Orange threshold
The Orange threshold control, numbered 14, defines the percentage at which a result begins to be highlighted as requiring attention.
When a value reaches or exceeds this threshold, Ergoniza Intelligent may display it in orange or begin a gradual transition toward orange in visualizations that use gradients.
This threshold identifies high values that are not yet considered critical but should be reviewed during the analysis.
Red threshold
The Red threshold control, numbered 15, defines the percentage at which a result is visually represented as critical.
When a value reaches or exceeds this threshold, it is displayed in red or through a gradual transition toward red. Treat this color as a visual warning that helps you quickly locate areas, joints, or indicators requiring greater attention.
As a general rule, keep the red threshold close to 100%. Setting it above 100% can be useful in exploratory or comparative analyses, but it reduces the system’s visual sensitivity and may prevent values at or above 100% from being highlighted in red.
Maintain sufficient separation between the orange and red thresholds. A common setting is approximately 85% for the orange threshold and 100% for the red threshold. If the values are too close, the orange warning range will be very narrow and the display will move quickly from green to red.
Auto-rotation speed
The Auto-rotation speed control, numbered 16, increases or decreases how quickly the model rotates when auto-rotation is enabled.
Auto-rotation lets you review the posture from different viewpoints without moving the camera manually. A low speed provides a more controlled inspection. A higher speed can be useful for a quick overall review but may make precise observation of posture details more difficult.
Recommendations for use
Use the visualization settings to improve inspection of the model and adapt the scene to your purpose.
For a detailed posture review, it may be useful to enable the reference system, anatomical planes, or transparent display. To prepare screenshots or review results, adjust the colors, lighting, and resolution. When working with posture sequences, prioritize smooth playback by reducing the resolution or disabling shadows if necessary.
The color thresholds let you adjust the visual sensitivity of the interface. For preventive interpretation, an orange threshold close to 85% and a red threshold close to 100% are usually appropriate. If you change these values, remember that only the visual representation of some percentage results changes, not the calculations or actual values.
These settings change the appearance of the scene but do not change the biomechanical assessment data.