Manual manipulation of the model posture
Ergoniza Intelligent lets you change the biomechanical model posture manually with the mouse. This is useful for representing a specific posture, correcting an automatically captured posture, or precisely adjusting a body segment before running an analysis.
Manual manipulation is performed by selecting the body segment to move directly on the model. The system then displays visual information and specific controls to assist editing.
Select a model segment
Select the body segment to manipulate with the mouse. The selected segment is highlighted in blue, as shown by item 1 in the figure.
The system also displays arrows on the model. They indicate the movement direction applied when you drag the segment. Item 2 in the figure shows this visual direction indicator.
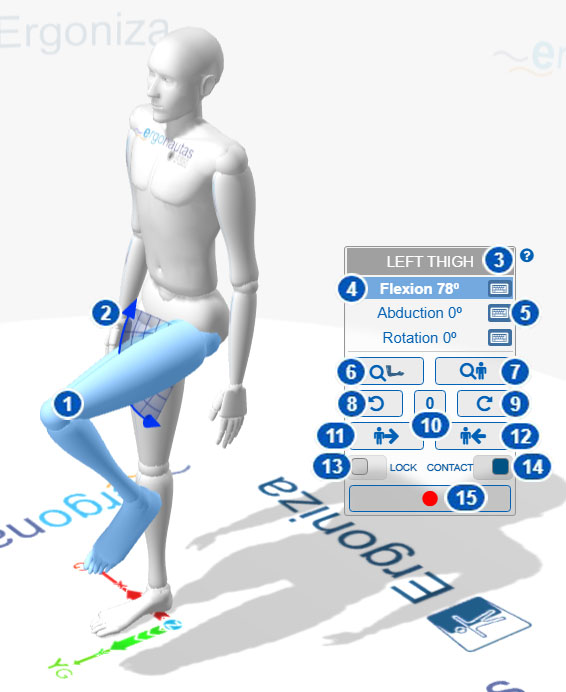
| No. | Element | Function |
|---|---|---|
| 1 | Selected segment | Identifies the model segment that will be changed. The active segment is highlighted in blue. |
| 2 | Movement arrows | Show the movement direction applied when the selected segment is dragged with the mouse. |
| 3 | Selected segment name | Displays the currently selected body segment. |
| 4 | Active movement direction | Identifies the movement changed when the segment is manipulated, such as flexion, abduction, or rotation. |
| 5 | Keyboard angle entry | Lets you enter the exact angle for the selected movement. |
| 6 | Zoom to selected segment | Magnifies the active segment to assist review and manipulation. |
| 7 | Zoom to full body | Restores the general view of the complete model. |
| 8 | Undo | Undoes the last movement made while editing the posture. |
| 9 | Redo | Redoes the last movement that was undone. |
| 10 | Neutral position | Places the selected segment in its neutral position. |
| 11 | Copy to symmetric segment | Copies the selected segment’s posture to its symmetric segment. Available for the upper and lower limbs. |
| 12 | Copy from symmetric segment | Copies the symmetric segment’s posture to the selected segment. Available for the upper and lower limbs. |
| 13 | Lock unselected segments | Locks movement of unselected segments during posture editing. |
| 14 | Maintain floor contact | Forces the model to maintain contact with the floor during manipulation. |
Posture-manipulation panel
When you select a model segment, the posture-manipulation panel appears. It displays the active segment and the movements available for it.
The selected segment appears at the top. In the figure, item 3 is the left thigh. The available movements, in this example flexion, abduction, and rotation, appear below it.
The active movement is highlighted. Item 4 shows that flexion is active, so dragging the segment primarily changes that movement.
Change the movement direction
To select a different movement:
- select another movement in the posture-manipulation panel;
- right-click the selected segment to cycle the active movement direction.
The arrows on the model change with the selected direction, helping you see how the segment will move when dragged.
This mechanism lets you switch among available movements without closing the panel or selecting another segment.
Enter an exact angle
To set a specific angle, use the keyboard icon beside the corresponding movement, identified by item 5.
This lets you enter the angle instead of dragging the segment. It is useful when a measurement is available or when the posture requires greater precision.
Use zoom while editing
The manipulation panel provides two zoom controls.
Item 6 magnifies the selected segment. This is useful for adjusting small joints or segments or when the active segment is partly hidden by the camera orientation.
Item 7 returns to a general full-body view. Use it to check whether the resulting posture remains consistent across the complete model.
While editing, alternate between a close view and the full-body view. A local correction can change the overall appearance of the posture.
Undo, redo, and return to neutral
Use the undo and redo controls to correct recent changes.
Item 8 undoes the last movement. Item 9 redoes the last movement that was undone.
Item 10 places the selected segment in its neutral position. Use it to reset a segment before adjusting it again.
Copy posture between symmetric segments
When an upper- or lower-limb segment is selected, you can copy postures between symmetric segments.
Item 11 copies the selected segment’s posture to the symmetric segment—for example, from one upper arm to the other or from one leg to the other.
Item 12 performs the reverse operation, copying the symmetric segment’s posture to the selected segment.
These options help create approximately symmetric postures or quickly match the positions on both sides.
Lock unselected segments
Item 13 locks movement of unselected segments during posture editing.
When enabled, manipulation is concentrated on the selected segment, helping position it without accidentally changing other model segments.
This is particularly useful when adjusting limbs or correcting complex postures while the rest of the body must remain stable.
Maintain floor contact
Item 14 forces the model to maintain contact with the floor during manipulation.
This helps preserve a more physically consistent posture when changing segments that can affect the body’s overall position. It is especially relevant to standing postures, single-leg support, or lower-limb movements.
If the model loses a reasonable support position while editing, enable this option and review the complete posture again.
Recommended procedure
- Select the segment to change.
- Confirm that it is highlighted in blue.
- Check the movement arrows to confirm the active manipulation direction.
- If another movement is required, select it in the panel or right-click the segment.
- Drag the segment to approximate the intended posture.
- For precision, enter the angle with the keyboard icon.
- Zoom to the selected segment if the joint requires closer review.
- Lock unselected segments to prevent accidental changes elsewhere.
- Maintain floor contact when the posture requires consistent supports.
- Review the complete posture before running an analysis.
Check before continuing
Before using the posture in an analysis, verify:
- that the selected segment is in the intended position;
- that the correct movement direction was changed;
- that no unintended changes occurred in other segments;
- that floor contact is consistent with the represented task;
- that the complete posture adequately represents the real situation to be assessed.
Always review a manually adjusted posture as a whole. A correctly positioned isolated segment does not guarantee that the overall posture represents the task.