AI image capture
The Image capture dialog automatically detects a person’s posture from an image using artificial-intelligence systems.
Open this dialog with the Photo button on the left sidebar. Use it to import an image, select the type of artificial intelligence, and run posture detection so that the Ergoniza Intelligent model adopts the detected posture.
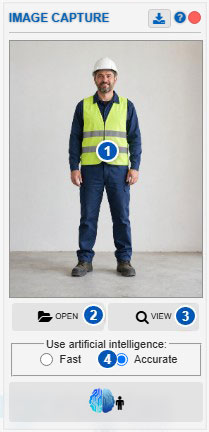
| No. | Area or control | Function |
|---|---|---|
| 1 | Loaded image | Displays the image selected for automatic posture detection. |
| 2 | Open | Selects and loads a new image file. |
| 3 | View | Opens the loaded image in the image viewer. |
| 4 | Artificial-intelligence type | Selects Fast AI or Accurate AI. |
| 5 | Detect posture | Starts AI processing of the image to detect the posture. |
Purpose of the dialog
Use the Image capture dialog when you have a photograph or still image containing the posture to be analyzed.
Ergoniza Intelligent can automatically detect the positions of the main body parts in the image and transfer the resulting posture to the biomechanical model. You can then review the posture, correct it manually if necessary, and use it in the analyses available in the system.
This procedure can save time compared with entering the posture manually, but always inspect the result before using it to draw ergonomic conclusions.
Loaded image
Area 1 displays the selected image.
After you open a file, the image appears in this area so that you can confirm it loaded correctly and contains the posture to be analyzed.
Before starting detection, check that:
- the complete person is visible or, at minimum, the body parts needed for the analysis;
- the posture is clearly visible;
- there are no major occlusions;
- the image is not excessively dark or blurred;
- the person is large enough within the image;
- the perspective allows the posture to be interpreted correctly.
Image quality directly affects the accuracy of automatic detection.
Open button
Button 2, Open, selects an image file.
Selecting it opens the system file picker. After you select an image, it is loaded into the dialog and becomes available for processing.
Loading a new image replaces the previous image in the dialog.
View button
Button 3, View, opens the loaded image in the Image viewer.
The image viewer displays the image within the interface at a more convenient size than the small preview in the dialog. Use it to inspect posture details, check for occlusions, or determine whether the image is suitable before running detection.
For more information about this tool, see Utilities, which describes the image viewer and other supplementary system tools.
Artificial-intelligence type
Area 4 selects the type of artificial intelligence used to detect the posture.
Two options are available:
- Fast;
- Accurate.
The selection affects how the image is processed and the balance among speed, privacy, and result accuracy.
Fast AI
The Fast option uses a detection system that runs locally on the user’s computer.
Its main characteristics are:
- shorter processing time;
- the image does not need to be sent to an external server;
- detection is more immediate;
- accuracy may be lower than with the Accurate option.
This option is appropriate when rapid detection is required, the image is clear, and all processing should remain on the local computer.
It can also be useful during preliminary work when you want an approximate posture that will subsequently be reviewed and corrected manually.
Fast AI detection parameters
Detection with Fast AI uses the parameters configured in Intelligent options.
These parameters adjust automatic posture capture when processing runs locally on the user’s computer. If the results obtained with the Fast option are unsuitable, review these settings before repeating detection.
The Intelligent menu includes parameters related to:
- processing accuracy;
- minimum detection confidence;
- minimum tracking reliability;
- minimum visibility required to accept body landmarks;
- detection smoothing;
- estimated camera height;
- contact tolerance;
- automatic foot-support adjustment.
These controls affect how the system interprets the image and accepts or rejects detected body landmarks. For example, increasing Min. reliability can make the system more selective and reject uncertain detections, while reducing it may accept more landmarks at a greater risk of errors. Similarly, Min. visibility affects the acceptance of partially obscured body landmarks.
Adjust these parameters carefully. Settings that are too permissive may accept incorrect detections, while settings that are too strict may prevent some body parts from being detected correctly.
For a detailed explanation of these controls, see Intelligent options.
Accurate AI
The Accurate option uses a higher-accuracy detection system but requires information to be sent to the Ergonautas server for processing.
Its main characteristics are:
- potentially higher detection accuracy;
- longer processing time;
- a connection to the server is required;
- the image or information required for external processing is sent to the server.
This option is appropriate when more reliable detection is required, especially for a complex posture or when detection accuracy is the priority.
Although this option may provide better results, you must still visually review the resulting posture.
Posture-detection button
Button 5 starts automatic posture detection.
Before selecting it:
- Load an image with Open.
- Confirm that the image is suitable.
- Select the type of artificial intelligence to use.
- Start detection with button 5.
After processing, the system displays the detected posture so that you can review it before using it in the assessment.
Reviewing the detected result
Treat automatic detection as an aid for capturing the posture, not as a replacement for technical review.
After processing the image, check that:
- the limbs are correctly located;
- the main joints correspond to the person in the image;
- occlusions have not caused errors;
- the upper arms, lower limbs, trunk, and head are positioned consistently;
- the biomechanical model reasonably represents the actual posture.
If a body part was not detected correctly, you may need to correct the posture manually. See Manual model-posture manipulation.
Images suitable for detection
For better results, use images with the following characteristics:
- the person’s complete body is visible;
- good lighting;
- no strong shadows;
- a background that is not excessively cluttered;
- the camera is positioned at a suitable height;
- the posture is visible without major occlusions;
- sufficient resolution, although it does not need to be very high;
- landscape orientation when possible.
The person should occupy a substantial portion of the image without appearing too small or too close to its edge.
If objects, loads, furniture, or other body segments obscure important body parts, the artificial-intelligence system may estimate their positions incorrectly.
Occlusions and nonvisible body parts
When a body part is not visible, the system may attempt to estimate its position. However, that estimate may not match the actual posture.
This is particularly important when:
- the upper arms are hidden behind the trunk;
- the lower limbs are hidden by tables, boxes, or machines;
- loads obscure the hands or upper arms;
- limbs are crossed;
- the image was captured from an unsuitable angle.
When you identify a possible occlusion, carefully review the result and correct the posture manually if necessary.
Relationship to manual posture manipulation
You can edit an AI-detected posture afterward by using the model’s manual manipulation controls.
This lets you correct small detection errors, adjust joint angles, or complete the posture when the image did not allow every body part to be detected correctly.
See:
Relationship to Multiple postures mode
Image capture can produce a posture that subsequently becomes part of a multiple-posture sequence.
When working with posture sequences, you can save the detected posture as a keyframe on the timeline. In that case, also review:
Recommendations for use
To use this dialog correctly:
- Select a clear image that represents the posture.
- Load the image with Open.
- Use View if you need to inspect it in greater detail.
- Select Fast or Accurate AI according to the desired balance among speed, privacy, and accuracy.
- Run detection with button 5.
- Visually review the detected posture.
- Correct any errors manually before performing the analysis.
- Update the results if you modify the posture after detection.
Related sections of the User manual
For more information about this dialog, see:
Related Technical foundations
For a more complete methodological explanation of automatic posture capture and the conditions for using images, see the Technical foundations, particularly:
- Artificial intelligence for posture detection
- Image- and video-capture methods
- Two artificial-intelligence methods in Ergoniza Intelligent
- Capture best practices
- AI versus MOCAP: scope, limitations, and user validation
These sections explain the conditions that affect automatic-detection accuracy and the differences between the available artificial-intelligence modes.