General interface
The Ergoniza Intelligent interface is organized around creating, reviewing, and analyzing postures and activities with an interactive biomechanical model. From the main screen, you can adjust the model, enter task conditions, run analyses, and review results.
The exact arrangement of the controls may vary with the active module, selected analysis, and application version. However, the general workflow remains consistent.
Main interface areas
The Ergoniza Intelligent main screen is divided into several functional areas. The following image shows their general location.
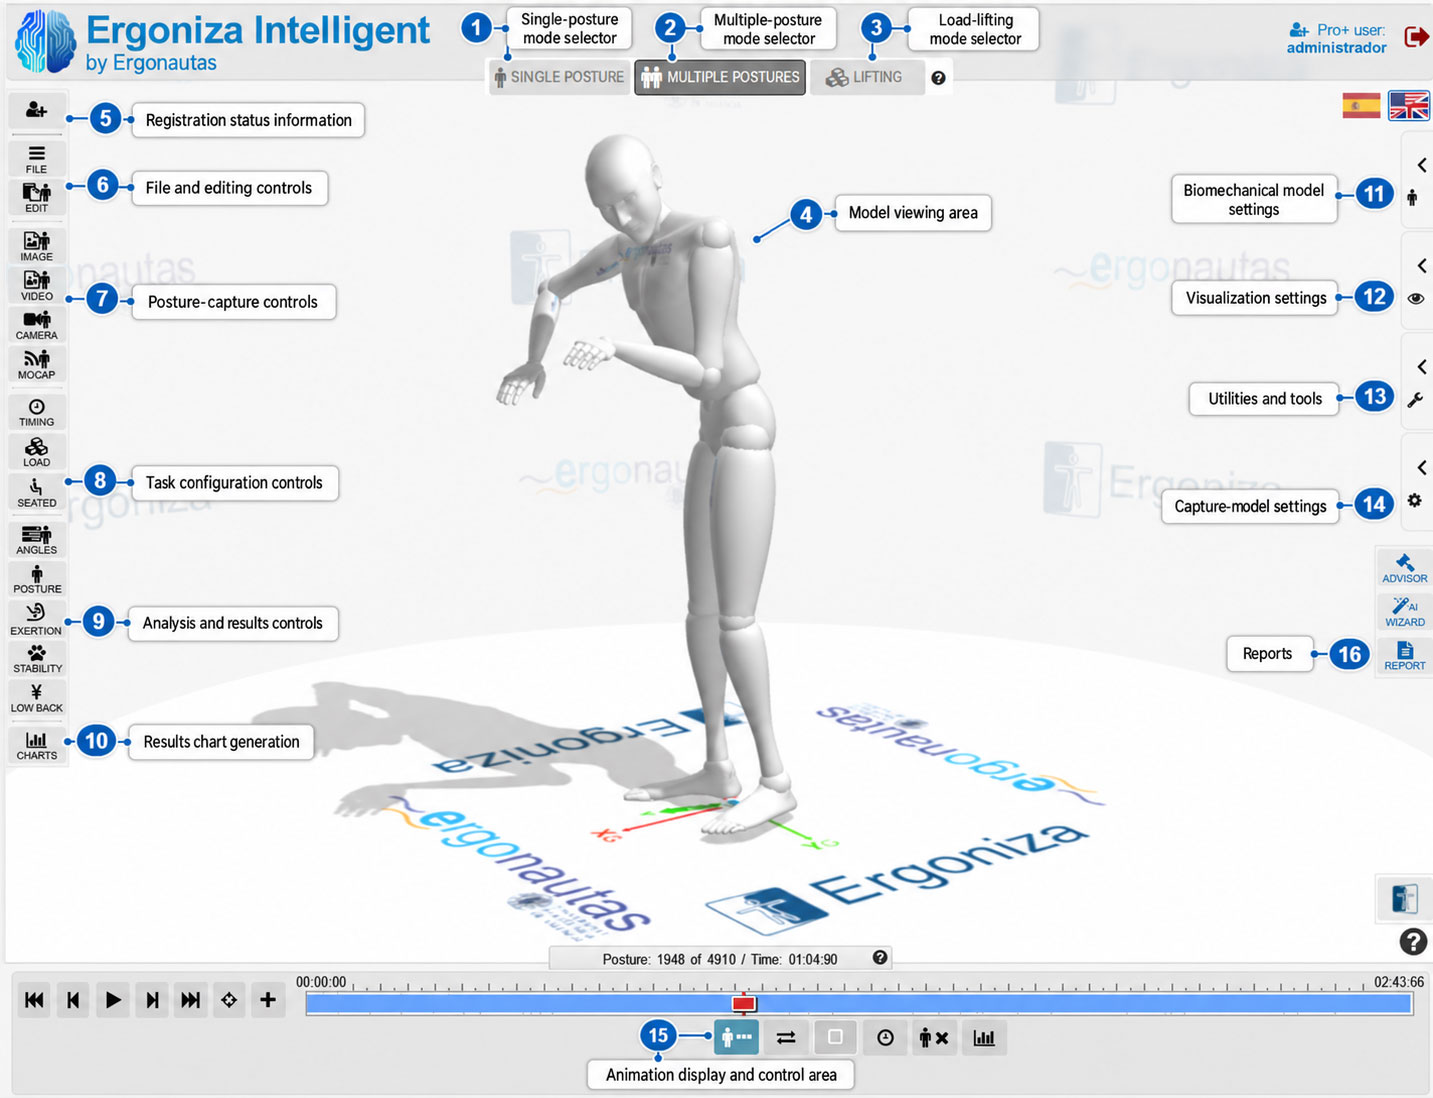
Each numbered area has a specific role in the workflow. Together, they let you select the assessment type, enter or capture postures, configure the task, run analyses, and review posture sequences.
| No. | Interface area | Main function |
|---|---|---|
| 1 | Single-posture mode selector | Works with a single posture, usually to assess a static situation or a specific point in a task. |
| 2 | Multiple-posture mode selector | Works with a posture sequence or a time-based activity made up of several points or phases. |
| 3 | Lifting mode selector | Opens the dedicated mode for analyzing lifting tasks, with a workflow designed for this type of assessment. |
| 4 | Model viewport | Displays the biomechanical model so you can visually review the posture, body orientation, and, when applicable, loads, forces, or results. |
| 5 | Registration status | Shows the user’s general registration status. |
| 6 | File and edit controls | Groups general file management and editing functions, such as opening and saving files or copying and pasting postures. |
| 7 | Posture capture controls | Enter postures from an image, video, camera, or sensors, depending on the options available in the application version. |
| 8 | Task settings controls | Define relevant task conditions, such as timing, loads, or seated posture, depending on the assessment type. |
| 9 | Analysis and result controls | Provide access to the main analyses and their results, including postural load, exertion, stability, and back analyses. |
| 10 | Result chart generation | Plots selected results or variables derived from the assessment. |
| 11 | Biomechanical model settings | Provides options for the human model used in the assessment, its characteristics, and its biomechanical configuration. |
| 12 | Visualization settings | Adjusts how the scene, model, and selected visual interface elements are displayed. |
| 13 | Utilities and tools | Groups supporting tools for editing, reviewing, or working with the assessment. |
| 14 | Capture model settings | Adjusts parameters for the systems or models used to capture postures automatically. |
| 15 | Animation display and controls | Plays, pauses, navigates, and manages posture sequences and moves through the assessment timeline. |
| 16 | Reports | Opens the Ergoniza Intelligent Report Generator. |
For an orderly workflow, first select the appropriate operating mode, enter or capture the posture or activity, review the model on screen, define the task conditions, and then run the required analyses.
Model viewport
The viewport displays the biomechanical model used to represent the posture or activity being assessed. Use this area to visually review the body position and verify that the entered or captured posture is consistent with the actual situation.
Use this area to check:
- overall body orientation;
- trunk, neck, upper-arm, and lower-limb positions;
- hand and foot placement;
- visible application of loads or forces, when enabled;
- colors or markers associated with selected analyses.
Always review the model before interpreting a result. If the posture does not accurately represent the task, the analysis will not be representative either.
Editing and capture controls
The editing and capture controls let you enter the posture or activity to be assessed.
Depending on the situation, you can:
- adjust the model posture manually;
- capture a posture from an image;
- capture a posture from a video;
- work with a time-based sequence;
- adjust or correct a captured posture;
- import data from external systems, when available.
When using automatic capture, always review the result before continuing. Automatic detection may require manual corrections, particularly when there are occlusions, partially hidden body segments, or poor-quality images.
Dialog boxes
Many Ergoniza Intelligent features are configured in dialog boxes. These dialogs let you enter parameters, enable options, adjust values, and perform specific actions.
Examples include dialogs for:
- entering loads or forces;
- configuring analyses;
- capturing postures;
- selecting timing values;
- displaying results;
- editing specific parameters.
Dialog boxes may contain buttons, drop-down lists, numeric fields, selectors, sliders, and enable/disable options. When a dialog includes a help icon, select it to open the corresponding manual topic.
Timeline
When working with activities or posture sequences, the timeline lets you review and edit how the task develops over time.
Use the timeline to:
- move through the activity;
- select specific time points;
- review keyframes;
- change the duration;
- work with intervals;
- view time-dependent results.
The timeline may play a secondary role when assessing a single posture. When analyzing an activity, verify that the sequence accurately represents how the actual task develops.
Analysis panels
The analysis panels let you select and run the procedures available in Ergoniza Intelligent.
Depending on the selected analysis, the system may require additional data such as loads, timing, repetition frequency, coupling conditions, initial posture, or method-specific settings.
Before interpreting a result, verify that the selected analysis matches the purpose of the assessment and that all required data has been entered.
Result areas
Results may be presented in tables, as numeric values, as colors on the model, in charts, or in dedicated dialogs. Their presentation depends on the analysis performed.
When reviewing results, consider:
- the body region or component being assessed;
- the resulting score, level, or category;
- the task conditions used;
- whether the result changes when the posture or load is modified;
- whether there are warnings or data that still require review.
Always interpret results in the context of the actual task being analyzed.
Contextual help
Some interface elements include a help icon. Select it to open the manual topic associated with the relevant dialog, tool, or feature.
Contextual help is intended to answer specific questions while you use the application. For an overview of the assessment process, see Quick assessment first.
Recommended workflow
For an orderly workflow, follow this general sequence:
- Define the task or posture to be assessed.
- Enter or capture the posture or activity.
- Visually review the model.
- Correct the posture if necessary.
- Enter the loads, timing, and task conditions.
- Select the appropriate analysis.
- Review the results.
- Save, export, or document the available information using the implemented features.
This sequence reduces the risk of interpreting results obtained from incomplete or unchecked data.