Utilities
The Utilities panel groups supplementary tools for viewing external files, capturing model images, applying preset postures, adding objects to the scene, and correcting postures globally across an animation. These functions make it easier to prepare, review, and document the assessment.
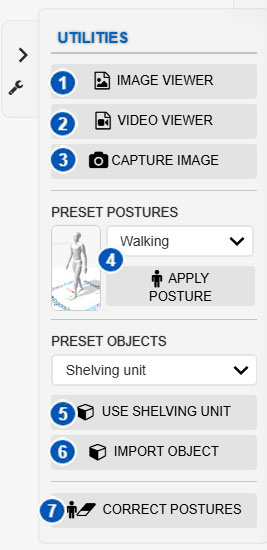
| No. | Control | Function |
|---|---|---|
| 1 | Image viewer | Opens the image viewer to display images within the interface. |
| 2 | Video viewer | Imports videos into the interface and synchronizes them with model movement. |
| 3 | Capture image | Captures an image of the model in its current posture. |
| 4 | Preset postures | Selects a preset posture and applies it to the model. |
| 5 | Use preset object | Adds the object selected from the preset-object list to the scene. |
| 6 | Import object | Imports external objects in OBJ, STL, or FBX format. |
| 7 | Correct postures | Opens the Posture correction over time dialog, available in Multiple postures mode. |
Image viewer
The Image viewer control, numbered 1, opens an image within the Ergoniza Intelligent interface.
Use this function to keep a reference image visible while reviewing a posture, compare the model with a photograph of the task, or consult visual material related to the assessment. The image viewer is particularly useful when working with postures reconstructed manually from a visual reference.
Video viewer
The Video viewer control, numbered 2, imports videos into the interface and synchronizes them with model movement.
This function makes it easier to compare movement observed in a video with the posture or animation represented by the biomechanical model. Use it to review the timing of an activity, compare a captured sequence, or maintain a visual reference while editing.
When using a video as a reference, confirm that the video and model are correctly synchronized before interpreting the activity or any resulting assessment data.
Capture image
The Capture image control, numbered 3, captures an image of the model in its current posture.
Use this function to document a particular posture, preserve a view of the scene, or prepare visual material for review, reports, or communication of results. Before capturing the image, adjust the camera orientation, model display, and visible scene elements so that the image is clear.
If the image will be used as assessment evidence, make sure the displayed posture corresponds to the instant or condition you intend to document.
Preset postures
The Preset postures section, numbered 4, loads predefined postures for the model to adopt automatically.
To use this function:
- Select the desired posture from the drop-down list.
- Select Apply posture.
- Review the result on the model.
This function is useful for starting an assessment from a reference posture, quickly creating an approximate body configuration, or comparing a manually entered posture with a standard posture.
Always review the model after applying a preset posture. The posture may require additional adjustments to accurately represent the actual task being assessed.
Preset objects
The Preset objects section adds objects to the scene. These objects can provide a visual reference for the work environment, furniture, a load, or an item with which the person interacts.
Select a preset object from the corresponding drop-down list. After selecting the object, use control 5 to add it to the scene.
This function can provide context for the posture, especially when body position depends on a nearby object, a support surface, an item being handled, or a particular spatial condition.
Importing external objects
The Import object control, numbered 6, adds non-preset objects to the scene.
This function imports objects from CAD systems or other sources in the following formats:
- OBJ;
- STL;
- FBX.
Importing external objects is useful when you need to represent a specific workstation component, tool, load, machine, or surface with a particular geometry.
After importing an object, review its position, orientation, and scale within the scene. A misplaced object can hinder visual interpretation of the posture or create an inconsistent representation of the work environment.
Posture correction over time
The Correct postures control, numbered 7, is available only in Multiple postures mode. It applies the same angular correction to a body part in every recorded posture of the animation. It can also correct the body’s overall height throughout the sequence.
This function is particularly useful for compensating for systematic deviations in motion-capture data. For example, it can correct a limb that appears rotated throughout a sequence imported from a MOCAP system because a sensor was calibrated incorrectly.
The tool modifies the entire animation as a single operation, so use it with caution and review the complete sequence afterward. For details about its controls, operation, and precautions, see Posture correction over time.
Recommendations for use
Use the Utilities panel to help prepare and review the assessment. Images, videos, preset postures, imported objects, and time-based correction tools can help represent the actual situation more accurately, but they should be used in a controlled manner.
Before using a captured image, synchronized video, or imported object as a working reference, confirm that:
- the image or video corresponds to the task being assessed;
- the model’s posture is consistent with the visual reference;
- imported objects have an appropriate scale and position;
- the scene contains no unnecessary elements that hinder review;
- the visualization still allows the model’s posture to be interpreted correctly;
- after a time-based correction, every posture in the sequence remains consistent with the observed activity.
Treat these utilities as assessment support tools. The validity of the analysis still depends on correctly defining the posture, loads, and task conditions.