Timeline
The timeline controls the animation of an activity composed of multiple postures. It is available only in Multiple Postures mode because it manages a time sequence, not an isolated posture.
Use it to play the activity, move among postures, select time intervals, turn interpolation on or off, manage selections, configure timing, and open activity charts.
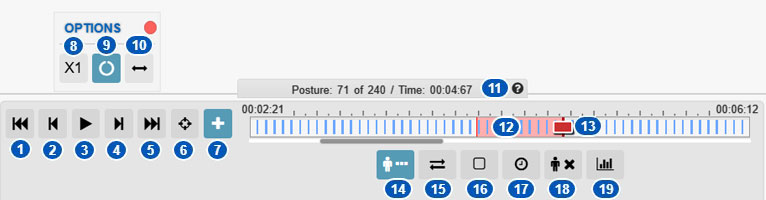
| No. | Control or area | Function |
|---|---|---|
| 1 | Go to start | Moves the time cursor to the start of the animation or selected interval. |
| 2 | Previous posture | Moves to the immediately preceding posture. |
| 3 | Play / stop | Starts or stops animation playback. |
| 4 | Next posture | Moves to the immediately following posture. |
| 5 | Go to end | Moves to the end of the animation or selected interval. |
| 6 | Center current posture | Centers the timeline on the current posture or instant. |
| 7 | Playback options | Opens timeline options. |
| 8 | Playback speed | Changes animation playback speed. |
| 9 | Loop playback | Turns continuous repetition on or off. |
| 10 | Play selected interval | Limits playback to the selected interval or allows the complete activity to play. |
| 11 | Posture and time information | Shows the current posture number and animation time. |
| 12 | Selected interval | Shows the selected time range. |
| 13 | Time cursor | Identifies the current animation instant and model posture. |
| 14 | Posture interpolation | Turns interpolation between registered postures on or off. |
| 15 | Select all postures | Selects all timeline postures. |
| 16 | Deselect postures | Clears the active posture or interval selection. |
| 17 | Posture recording | Opens posture-sequence duration settings. |
| 18 | Delete postures | Opens the posture-deletion window. |
| 19 | Activity-condition charts | Opens activity-condition charts. |
What the timeline represents
The timeline represents the evolution of an activity made up of multiple postures. Each registered posture is placed at a specific instant and can define the model position, loads, analysis conditions, and other activity parameters.
Multiple-posture analysis interprets a sequence rather than an isolated model position. This enables time-dependent calculations such as exertion evolution, discomfort, cumulative load, lumbar compression, and weight distribution.
Keyframes
Registered postures appear as vertical marks called keyframes.
A keyframe is an explicitly defined posture at a particular animation time. At that point, the model adopts the registered posture and its associated conditions.
The system can generate intermediate postures between keyframes when interpolation is enabled.
Changing the time of a registered posture
Place the pointer over a keyframe mark. When it changes to a horizontal-resize cursor, drag the keyframe left or right.
Dragging changes the time in the sequence, not the registered body posture. It may change the relative duration of segments before and after the posture.
Moving a keyframe recalculates temporal conditions and interpolation. If interpolation is enabled, intermediate postures between the moved keyframe and its neighbors may change. Play the animation afterward to verify that transitions still represent the actual task.
Update associated results or charts when necessary because a change in timing can affect time-dependent analyses.
Time cursor
Cursor 13 identifies the current animation instant. The model shows the posture for that time.
On a keyframe, it shows the registered posture. Between keyframes, with interpolation enabled, it shows a calculated intermediate posture.
Area 11 shows the current posture and time.
Posture and time information
Area 11 shows:
- the current posture number;
- its time within the animation.
This is particularly useful in long activities and when relating a posture to a chart result.
Navigation and playback controls
Controls 1 through 5 navigate and play the animation.
Go to start
Control 1 moves to the beginning of the animation, or to the beginning of an active selected interval.
Previous posture
Control 2 moves to the immediately preceding keyframe for posture-by-posture review.
Play or stop
Control 3 starts or stops playback. During playback, the cursor advances and the model adopts the corresponding postures. With looping enabled, playback restarts at the end of the active range.
Next posture
Control 4 moves to the immediately following keyframe.
Go to end
Control 5 moves to the end of the animation or selected interval.
Center current posture
Control 6 centers the timeline view on the current posture or instant. Use it after horizontally scrolling a long activity.
Playback options
Control 7 opens options 8, 9, and 10.
Playback speed
Control 8 changes playback speed. Higher values play faster; lower values support slower, more detailed review.
Loop playback
Control 9 turns looping on or off. When enabled, playback restarts at the end of the activity or selected interval.
Limit playback to the selected interval
Control 10 determines whether playback is limited to the selected interval or uses the complete activity.
Selecting intervals
Select a time interval by clicking and dragging on the timeline. You can also hold Shift and click another point.
The selected interval is shown in red in area 12. Use intervals to play or review a particular phase or apply operations to selected postures.
Posture interpolation
Control 14 turns posture interpolation on or off.
Interpolation calculates intermediate postures between two keyframes.
Interpolation enabled
The model transitions continuously through calculated intermediate postures instead of jumping between keyframes. Results can also be evaluated at these intermediate instants.
Interpolation disabled
The model retains registered postures without generating smooth transitions. The activity is interpreted as a discrete sequence of keyframes, which is useful when intermediate calculated positions would not represent the actual task.
Precautions
Interpolation improves continuity but can generate unrealistic intermediate postures when neighboring keyframes differ greatly. For complex activities, register enough keyframes to represent the real movement.
Adding or modifying postures
Manual model-posture editing uses the controls described under Manual manipulation of the model posture.
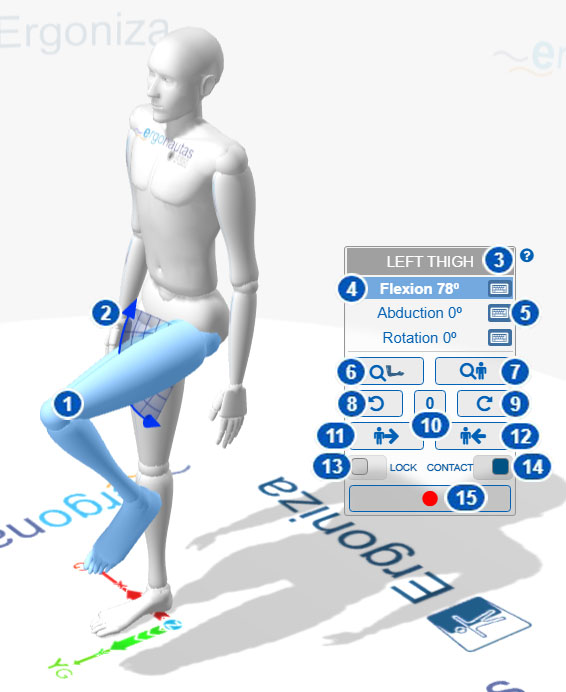
Button 15 in that window stores the current model posture on the timeline. Its effect depends on cursor position.
Adding a new posture
- Place the time cursor at the intended instant.
- Adjust the model posture.
- Select button 15 in the manual-posture window.
The current posture is stored as a new keyframe. With interpolation enabled, intermediate postures are calculated to adjacent keyframes; otherwise it remains a discrete posture.
Modifying an existing posture
- Place the cursor exactly on the keyframe to modify.
- Adjust the model posture.
- Select button 15.
The existing keyframe is updated rather than adding a posture at another time.
Precautions
Verify cursor position before storing a posture. Also check interpolation, because changing a keyframe can alter neighboring intermediate postures. Play the animation afterward and update affected results and charts.
Select and deselect postures
Timeline control 15 selects all postures. Control 16 clears the active selection.
Posture-sequence duration
Control 17 opens Posture Sequence Duration, where you can change sequence duration and related timing parameters. See Posture recording.
Deleting postures
Control 18 opens Delete Postures. See Delete postures. Verify the active selection before deleting.
Activity-condition charts
Control 19 opens Activity-condition charts.
Relationship to charts
The timeline is synchronized with Charts.
Selecting a chart point can move the animation to that instant. Moving the timeline cursor can update chart values for the current instant. This connects:
- model posture;
- time;
- biomechanical results;
- postural load;
- lumbar compression;
- cumulative load;
- other time-based variables.
Relationship to temporal analyses
The timeline supports:
- cumulative exertion load;
- evolution of postural discomfort;
- biomechanical results over time;
- lumbar compression during the activity;
- weight distribution among supports;
- time-based charts;
- activity repetitions.
Configure cycles and rest under Activity repetitions.
Recommendations for use
- Register enough key postures to describe the activity.
- Adjust sequence duration as needed.
- Enable interpolation for continuous transitions.
- Disable interpolation to analyze only discrete postures.
- Use intervals to review specific phases.
- Play the sequence to verify that it represents the actual task.
- Update analyses and charts after changing postures, loads, or timing.
- Review the activity with its result windows.
Related User Manual sections
- Activity repetitions
- Charts
- New chart
- Exertion
- Cumulative exertion load
- Postural load
- Lumbar compression
- Posture recording
- Delete postures
- Activity-condition charts
Relationship to the Technical foundations
For more information, see:
- Conceptual differences between single- and multiple-posture analysis
- Cumulative exertion load in multiple-posture analysis
- Cumulative exertion-load concept
- Temporal integration of dose and cumulative-load update
- Repeated tasks and rest between repetitions
These sections explain the importance of time in multiple-posture analysis and how load accumulates throughout an activity.